


Freebies
The Freebies are plug-in filters for Photoshop and other paint programs. They change images in simple ways and you can use them free of charge.
How to install
Illustrated installation instructions are online.
To use this software, you need a paint program which accepts standard Photoshop 3.02 plugins.
Just put the plug-in filter into the folder where your paint program expects to find it. If you have Photoshop, the folder is Photoshop:Plugins:Filters or Photoshop:Plug-ins. You must restart Photoshop before it will notice the new plug-ins. They will appear in the menus as Filters->Flaming Pear->[name of plugin].
Most other paint programs follow a similar scheme.
If you have Paint Shop Pro: you have to create a new folder, put the plug-in filter into it, and then tell PSP to look there.
PSP 7:
Choose the menu File-> Preferences-> File Locations... and choose the Plug-in Filters tab. Use one of the "Browse" buttons to choose the folder that contains the plug-in.
The plugin is now installed. To use it, open any image and select an area. From the menus, choose Effects->Plug-in Filters->Flaming Pear->[name of plugin].
PSP 8, 9, and X:
Choose the menu File-> Preferences-> File Locations... In the dialog box that appears, choose Plug-ins from the list. Click "Add." If you are using PSP 8 or 9, click "Browse". Now choose the folder that contains the plug-in.
The plugin is now installed. To use it, open any image and select an area. From the menus, choose Effects->Plugins->Flaming Pear->[name of plugin].
Effects
Most of these filters do just one effect apiece and have no controls.
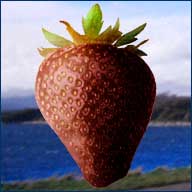
Here are some example effects that you can do. Open a favorite
picture for these examples -- you won't see anything if you start
with a blank canvas. Select part of the picture, and invoke a
filter.
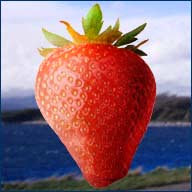 |
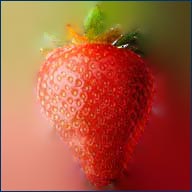
Original image |
 |
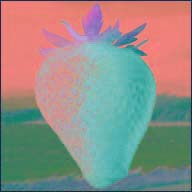
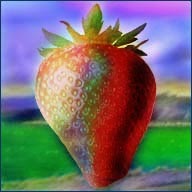
Tachyon
Tachyon ("Tak-ee-on," a faster-than-light particle) inverts the the bright and dark areas of your picture, but does not change the hues. Ordinary inversion would change blue to yellow, for example. |
 |
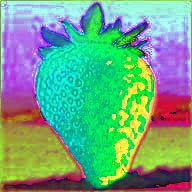
ChromaSolarize
ChromaSolarize combines the Tachyon effect with solarization, which produces attractive surreal effects. |
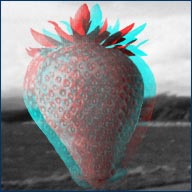 |
Anaglyph Flip
Exchanges the left-eye and right-eye channels in red/cyan anaglyphic 3D pictures. |
| Pixel Trash
Produces a blocky, garish look like the most primitive graphics of 1982. There is a separate Pixel Trash guide. |
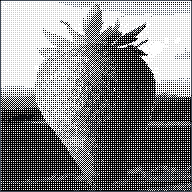 |
Demitone 25 and Demitone 50 Two ways of making a quasi-Bayer halftone pattern that includes shades of grey. |
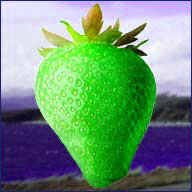 |
Swap Red & Blue Swap Red & Green Swap Green & Blue These filters work on RGB images – those with three channels of color: red, green, and blue. By swapping data between channels, they transform color, changing the picture’s chromatic harmonies in useful ways. |
 |
Gray from Red Gray from Green Gray from Blue These copy one color channel into both other channels. |
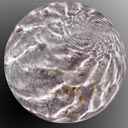
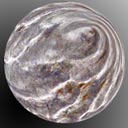
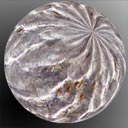 sphere with plain square tile
|
Sphere Warp A and Sphere Warp B These bend square tiles so they can texture-map a sphere without an ugly pinch at the poles. You will probably want to use two copies of the warped tile side-by-side
to make an equirectangular sphere map. |
 |
RGB->HSL and HSL->RGB RGB->HSL takes a normal image with its red, green, and blue color channels and replaces these with hue, saturation, and luminance respectively. Your paint program will think the image is still in RGB form, so the colors will look bizarre. HSL->RGB changes the image back. The HSL color system is a way of representing colors. Hue is the property of a color that classifies it as red, yellow, blue or green, or a blend of these. Saturation is the vividness of the color; and luminance is the total amount of light it throws off. If you use these filters and your paint program lets you paint into individual color channels, you can change the image in a way difficult to do in RGB mode. Try Using RGB->HSL, then Gaussian Blur, then HSL->RGB. |
 |
RGB->Lab and Lab->RGB As above, but for the Lab color space. L is luminance, a is red/green, and b is blue/yellow. |
 |
Vitriol
Vitriol changes colors’ contrast as if viewed through colored glass, but without tinting the image. Imagine you want to use black-and-white film to take a spooky picture of a landscape. You could make the sky unnaturally dark by placing a yellow glass filter over the lens; this will make the blue sky very dark, while the appearance of the green landscape is affected very little. It would be fun to do the same effect in color. But the yellow filter would of course make the picture yellowish. But Vitriol will get the contrast effect without the colorization. Just set the foreground color to the color of the imaginary colored glass, and choose Vitriol from the Filter menu. Vitriol automatically provides density correction, so you can use a strongly colored filter without making your picture go dark. The effect is most vivid on areas of strongly saturated color; apply repeatedly to intensify the result. |
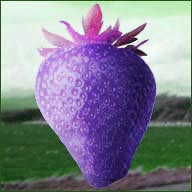 |
Kyoto Color
Kyoto Color changes color using a Hue/Luminance/Saturation color space, but it's not the same HLS color space built into Photoshop. The Kyoto space produces more lifelike results for massive hue changes. |
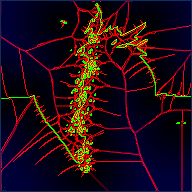 |
Veins
Draws a green contour, a blue distance map, and red ridges. |
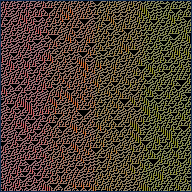 |
Rule30
The rule 30 cellular automaton. It starts from a random state. |
 |
Make Cube Tile and Make Iso Cube Tile Make Cube Tile takes a square image and modifies it so that six tiles can seamlessly cover a sphere. Flexify can use these tiles as input. Make Iso Cube Tile preserves symmetry at the cost of a more warped appearance on the sphere. |
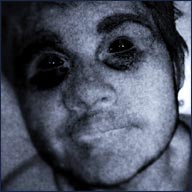 |
Zombie
Revives the undead. Best results arise from portraits showing eyes and teeth. |
 |
Zephyr
Produces colorful haze. |
 |
Circle to Square
Warps global shape, preserves local shape. There is a separate Circle to Square Guide. |
 |
Ornament
Ornament takes a photo of a mirrored ball and unwraps the reflection into a form called an "equirectangular panorama." There is a separate Ornament Guide. |
Solidify turns an image layer entirely 100% opaque. It reveals
partially transparent areas, and can even help repair the corrupted
transparency channel that some paint programs occasionally produce.
It's also good for quickly filling in missing regions of a panorama. Solidify A softly blurs the solid part into the transparent region. Solidify B smears only the outer edge for a harder look. Solidify C gives the smoothest, most uniform result. Ghost turns an image layer into a semitransparent picture made entirely of black pixels. It produces a smoked-glass effect that's hard to produce by hand.
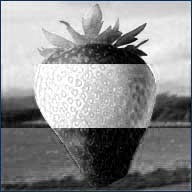
The following filters only operate on layers with a transparency channel. In these examples the strawberry was in a different layer from the background.
Solidify A, B, and C
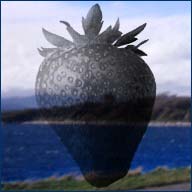
Ghost
 |
AntiGhost
AntiGhost turns a layer's transparency values into shades of grey. |
TransLine makes every second scanline transparent. TransTone is similar, but turns a 50% pattern of pixels transparent. This can be useful if you are making transparent GIFs for the web.
![]()
TransLine and TransTone
Other Plug-in Filters
Flaming Pear Software has more complex filters available here. They all come with a free trial period, after which they can
be purchased online or off.
Questions
Answers to common technical questions appear on the support page, and free upgrades appear periodically on the download page.
Trouble with your order? Orders are handled by Kagi, which can be reached at admin@kagi.com .
For bug reports and technical questions about the software, please write to support@flamingpear.com .